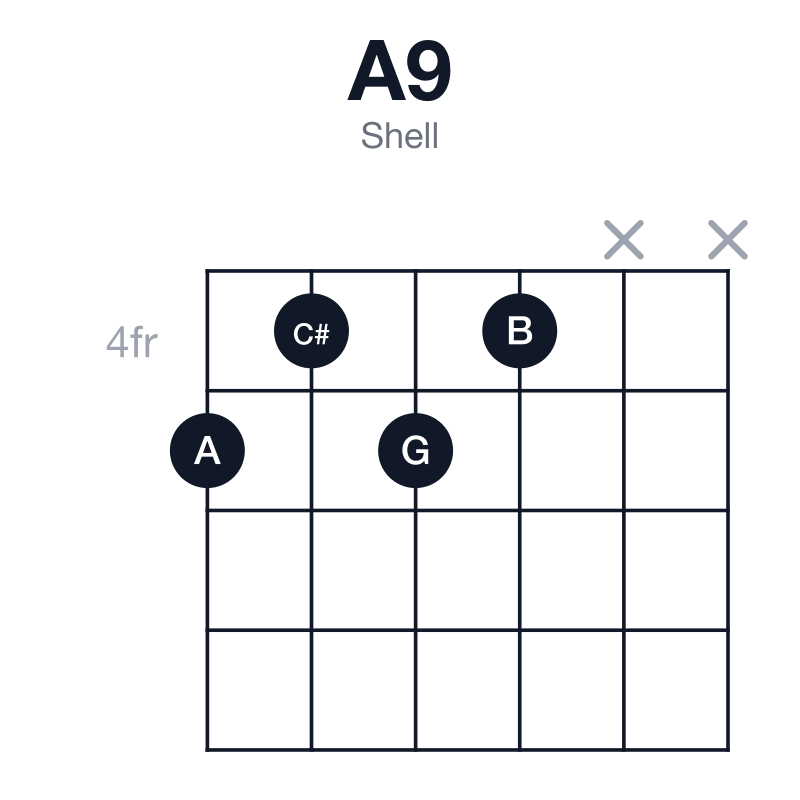
Root, third and seventh: the guide tones fix the quality, so the fifth is dropped. That is what leaves a string free, so pick a tension to put on top.
A9 is A, C#, E, G and B — A7 with the ninth stacked on top.
It sounds bright and full, still clearly pulling. The ninth adds height without softening the tritone underneath it, which is why funk and soul comp on this rather than on a plain 7.

| A | C# | E | G | B |
|---|---|---|---|---|
| 1 | 3 | 5 | ♭7 | 9 |
Dominant — the same pull as a 7, with more colour.
Also written Adom9 or A dominant 9. The same chord either way; which spelling you meet depends on who wrote the chart.
Root, third and seventh. The third and seventh, the guide tones, are what make the chord major, minor or dominant, so the fifth can go: it says nothing the symbol needs.
Three notes means a spare string, which is the real point. Put a tension on it.
A9 has 4 of them, on the bottom four strings, the top four strings, the middle four strings and strings 5-3-2-1, from the 2nd fret up to the 11th — all in one inversion, so the bass note never moves. The one to learn first is the A shape at the 4th fret, which is the easiest grip here.
Start with 542000 — no barre and 3 open strings. 2 of the 10 shapes here sit in open position. 5 of the 10 need a barre. Together they cover the neck from the 2nd fret to the 12th.
| Frets | Where | Bass | Top | Hand |
|---|---|---|---|---|
| x22223 | 2nd fret | B, 9th in the bass | G | barred |
| x02423 | open position | A, root position | G | 1 open string |
| 542000 | open position | A, root position | E | 3 open strings |
| 522423 | 2nd fret | A, root position | G | barred |
| 5454xx | 4th fret | A, root position | B | all fretted |
| 575457 | 4th fret | A, root position | B | barred |
| 575657 | 5th fret | A, root position | B | barred |
| xx7687 | 6th fret | A, root position | B | all fretted |
| 9x7987 | 7th fret | C#, 1st inversion | B | all fretted |
| x-12-11-12-12-12 | 11th fret | A, root position | E | barred |
The same notes rebuilt from scratch give 12 drop 2, 9 drop 3, 14 rootless and 6 open string voicings, each on its own page.
Tensions. A shell of A9, root, third and seventh, leaves a string free, and the tones that belong over it are the #11 (D#), the b13 (F) and the 13 (F#).
A9 is the V of D, and that is where it goes if it goes anywhere: the third and the flat seventh are a tritone apart, and both resolve by a semitone into D.
Voice by voice, A9 → D. 2 voices move by a semitone, and one note is common to both chords.
| In A9 | Moves | In D |
|---|---|---|
| A, the root | stays where it is | A, the fifth |
| C#, the major third | rises a semitone | D, the root |
| E, the fifth | falls a whole tone | D, the root |
| G, the flat seventh | falls a semitone | F#, the major third |
| B, the ninth | falls a whole tone | A, the fifth |
In which keys. Every note of A9 belongs to D major (the V, the dominant) and B minor (the ♭VII).
Every note of A9 is in A mixolydian and A lydian dominant.
Change one note of A9 and you have Amaj9 (the flat seventh becomes a major seventh), Am9 (the major third becomes a minor third), Aadd9 (drop the flat seventh), A69 (the flat seventh becomes a sixth), A7 (drop the ninth) or A9b5 (the fifth becomes a flat fifth).
A9 is a dominant chord — root, major third, fifth, minor seventh. Dominant seventh chords on every root.
On A9’s sound and use this page follows Mark Levine, The Jazz Theory Book (Sher Music, 1995). The shapes and the derived voicings come from different places, and both are explained in where the chords and the theory come from.
Shows each chord the way this style would voice it, and marks which of its alternatives belong to the idiom.