D9#11 guitar chord

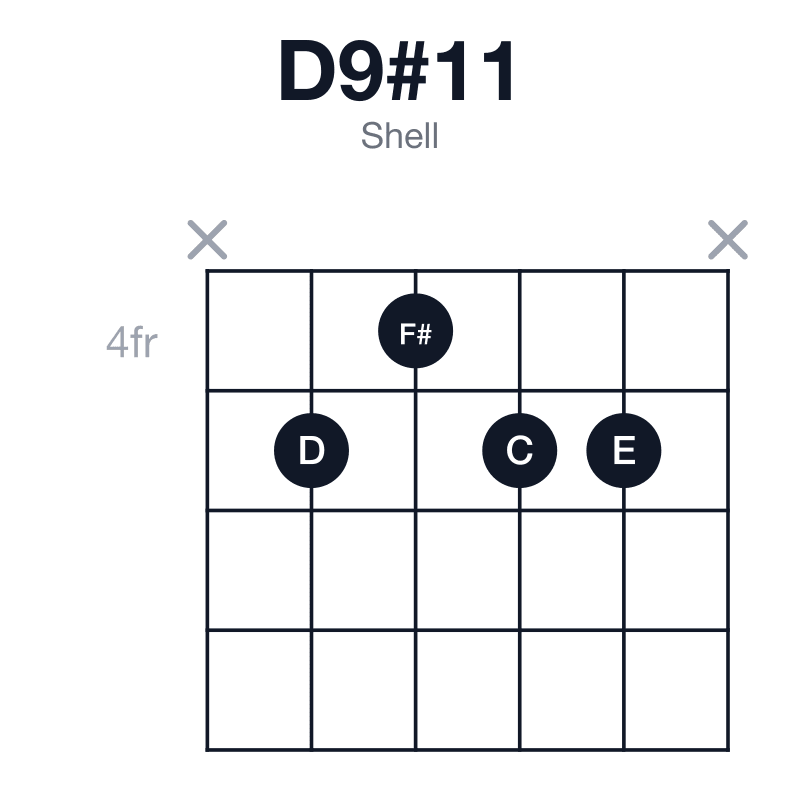
Shell + 9 · omits #11 · strings 5432 · Root position1 of 3

Root, third and seventh: the guide tones fix the quality, so the fifth is dropped. That is what leaves a string free, so pick a tension to put on top.

Tension
  • Tap a note to hear it
  • Arrows change position
  • Fingers, notes or intervals
  • Play the chord
About D9#11shell voicings

D9#11 is D, F#, A, C, E and G# D9 with the raised eleventh added on top.

It sounds wide and glassy, bright rather than tense. The ♯11 clears the major third by a whole step, so it adds height without the collision a natural eleventh makes.

D9#11 shell guitar chord diagram: D, F#, A, C, E, G#, played x5455x
D9#11 shell, x5455x — the shape above, as a picture.

D9#11 notes and formula

Notes and interval formula
DF#ACEG#
135♭79♯11

Dominant — the lydian dominant sound.

Also written D9(#11), D9+11 or D9♯11. The same chord either way; which spelling you meet depends on who wrote the chart.
How to play D9#11

Shell voicing
R35♭7

Root, third and seventh. The third and seventh, the guide tones, are what make the chord major, minor or dominant, so the fifth can go: it says nothing the symbol needs.

Three notes means a spare string, which is the real point. Put a tension on it.

D9#11 has 8 of them, on the middle four strings, the bottom four strings, the top four strings, strings 5-3-2-1 and strings 6-4-3-2, from the 4th fret up to the 11thall in one inversion, so the bass note never moves. The one to learn first is the D shape at the 4th fret, which is the easiest grip here.

Start with xx0112no barre and 1 open string. 1 of the 8 shapes here sits in open position. 3 of the 8 need a barre. Together they cover the neck from the 1st fret to the 14th.

Every common shape for D9#11
FretsWhereBassTopHand
xx0112open positionD, root positionF#1 open string
x545544th fretD, root positionG#barred
x5657x5th fretD, root positionF#all fretted
x907987th fretF#, 1st inversionC1 open string
10-9-10-9-9-109th fretD, root positionDbarred
10-x-10-11-9-x9th fretD, root positionG#all fretted
10-11-10-11-10-1010th fretD, root positionDbarred
x-x-12-13-13-1412th fretD, root positionF#all fretted

The same notes rebuilt from scratch give 13 rootless and 2 open string voicings, each on its own page.

Tensions. A shell of D9#11, root, third and seventh, leaves a string free, and the tones that belong over it are the b13 (Bb) and the 13 (B).

How to use D9#11

D9#11 is a dominant with its tension raised, so it still points at G — harder than a plain seventh does, because the altered tones sit a semitone from where they are going.

Voice by voice, D9#11G. 3 voices move by a semitone, and one note is common to both chords.

In D9#11MovesIn G
D, the rootstays where it isD, the fifth
F#, the major thirdrises a semitoneG, the root
A, the fifthfalls a whole toneG, the root
C, the flat seventhfalls a semitoneB, the major third
E, the ninthfalls a whole toneD, the fifth
G#, the sharp eleventhfalls a semitoneG, the root

What to play over D9#11

Every note of D9#11 is in D lydian dominant.

Chords near D9#11

Change one note of D9#11 and you have D9 (drop the flat fifth), D9b5 (drop the fifth) or D13 (the flat fifth becomes a sixth).

D9#11 is an altered chord — a dominant seventh with its fifth or ninth moved. Altered dominant chords on every root.

On D9#11’s sound and use this page follows Mark Levine, The Jazz Theory Book (Sher Music, 1995). The shapes and the derived voicings come from different places, and both are explained in where the chords and the theory come from.

Midi Settings

7.5
Play Style
One pass of the pick from the lowest string up, everything left ringing.
Instrument
350
150

Style

Shows each chord the way this style would voice it, and marks which of its alternatives belong to the idiom.

Layout

Left Handed Mode