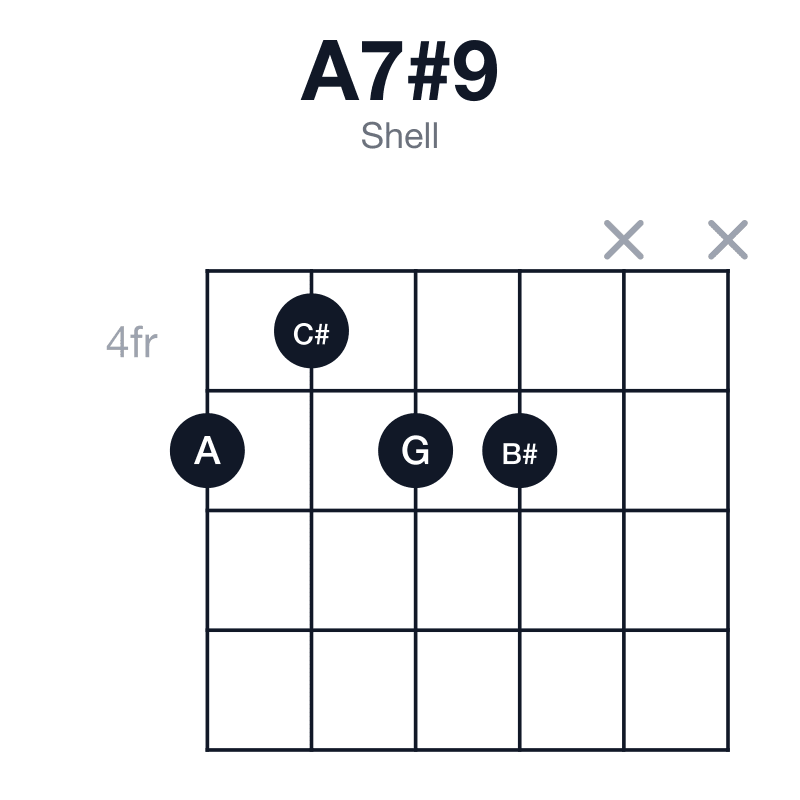
A7#9 guitar chord

Shell · strings 6543 · Root position1 of 3

Root, third and seventh: the guide tones fix the quality, so the fifth is dropped. That is what leaves a string free, so pick a tension to put on top.

Tension
  • Tap a note to hear it
  • Arrows change position
  • Fingers, notes or intervals
  • Play the chord
About A7#9shell voicings

A7#9 is A, C#, E, G and B# A9 with the ninth raised a semitone.

It sounds gritty and contradictory. The minor third sounding over the major third; every guitarist knows it as the Hendrix chord.

A7#9 shell guitar chord diagram: A, C#, E, G, B#, played 5455xx
A7#9 shell, 5455xx — the shape above, as a picture.

A7#9 notes and formula

Notes and interval formula
AC#EGB#
135♭7♯9

Altered dominant — dominant function with a blues third on top.

Also written A7(#9), A7+9 or A7♯9. The same chord either way; which spelling you meet depends on who wrote the chart.

How to play A7#9

Shell voicing
R35♭7

Root, third and seventh. The third and seventh, the guide tones, are what make the chord major, minor or dominant, so the fifth can go: it says nothing the symbol needs.

Three notes means a spare string, which is the real point. Put a tension on it.

A7#9 has 3 of them, on the bottom four strings, the top four strings and the middle four strings, from the 4th fret up to the 11thall in one inversion, so the bass note never moves. The one to learn first is the A shape at the 4th fret, which is the easiest grip here.

Start with xx7688no barre. None of the shapes for A7#9 uses an open string, so every one of them is movable; the lowest sits at the 2nd fret. 4 of the 9 need a barre. Together they cover the neck from the 2nd fret to the 13th.

Every common shape for A7#9
FretsWhereBassTopHand
x322232nd fretB#, 9th in the bassGbarred
5455xx4th fretA, root positionB#barred
x455554th fretC#, 1st inversionAbarred
5756885th fretA, root positionB#all fretted
5756585th fretA, root positionB#barred
xx76886th fretA, root positionB#all fretted
x776886th fretE, 2nd inversionB#all fretted
x-0-10-9-8-98th fretA, root positionC#1 open string
x-12-11-12-13-x11th fretA, root positionB#all fretted

The same notes rebuilt from scratch give 12 drop 2, 9 drop 3, 14 rootless and 5 open string voicings, each on its own page.

Tensions. A shell of A7#9, root, third and seventh, leaves a string free, and the tones that belong over it are the #11 (D#), the b13 (F) and the 13 (F#).

How to use A7#9

A7#9 is a dominant with its tension raised, so it still points at D — harder than a plain seventh does, because the altered tones sit a semitone from where they are going.

Voice by voice, A7#9D. 2 voices move by a semitone, and one note is common to both chords.

In A7#9MovesIn D
A, the rootstays where it isA, the fifth
C#, the major thirdrises a semitoneD, the root
E, the fifthfalls a whole toneD, the root
G, the flat seventhfalls a semitoneF#, the major third
B#, the sharp ninthrises a whole toneD, the root

What to play over A7#9

Every note of A7#9 is in A half-whole diminished.

Chords near A7#9

Change one note of A7#9 and you have Am7 (drop the major third), Am9 (the major third becomes a ninth), A7 (drop the minor third), A9 (the minor third becomes a ninth), A7b9 (the minor third becomes a flat ninth) or A/G (drop the minor third).

A7#9 is an altered chord — a dominant seventh with its fifth or ninth moved. Altered dominant chords on every root.

On A7#9’s sound and use this page follows Mark Levine, The Jazz Theory Book (Sher Music, 1995). The shapes and the derived voicings come from different places, and both are explained in where the chords and the theory come from.

Midi Settings

7.5
Play Style
One pass of the pick from the lowest string up, everything left ringing.
Instrument
350
150

Style

Shows each chord the way this style would voice it, and marks which of its alternatives belong to the idiom.

Layout

Left Handed Mode